After logging into your ClockIt account you will need to click on employees as shown in the image below or click on Company > Manage Users
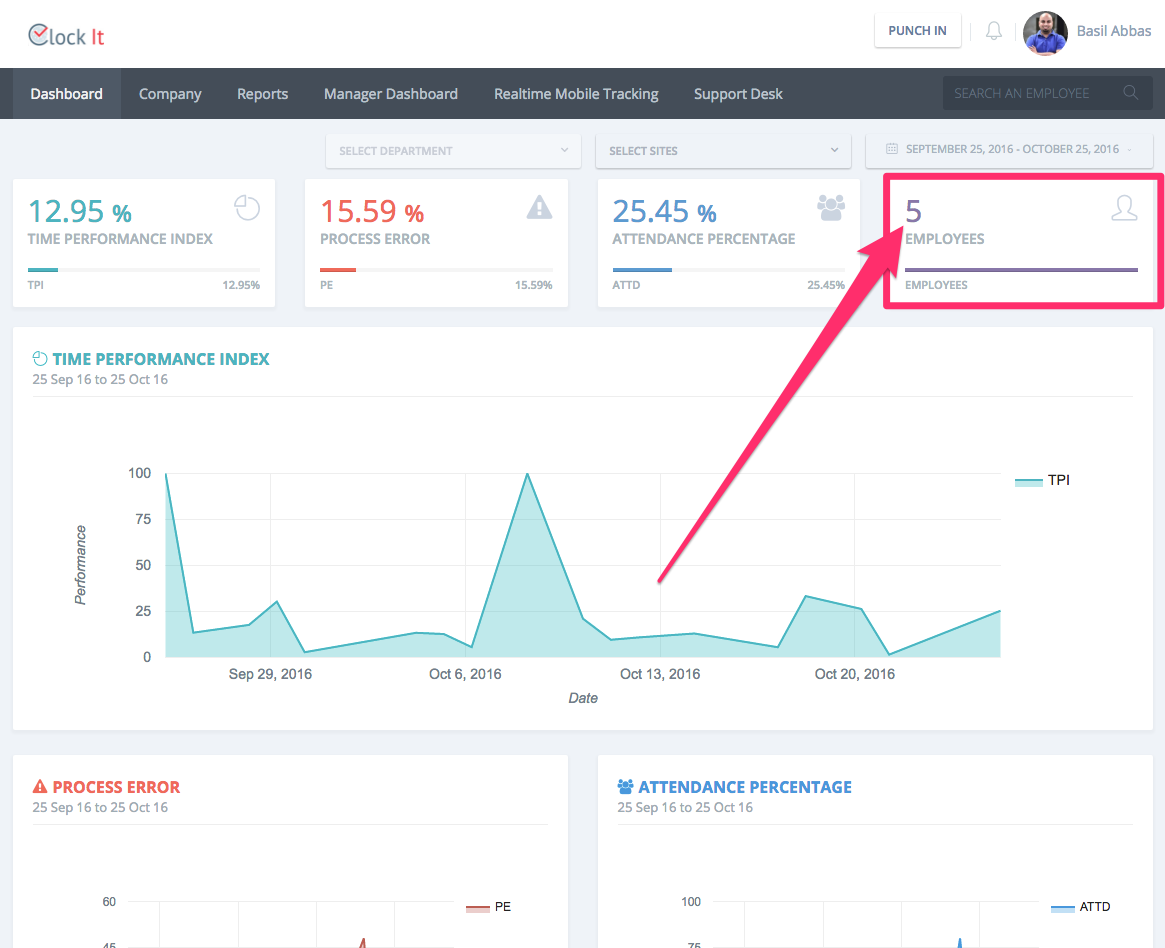
ClockIt always counts the total number of active users. This count is what is used for billing as well. You can have as many inactive users as you wish in your account. Note that if the user count increases beyond what your current plan supports then your account will get locked and you will need to upgrade your plan to add more users.
On this page you can add users by clicking on the add new button. At the time of writing ClockIt does not support CSV upload. This is a planned feature that will be released in the future.
If your users have got added as a result of you syncing the device to ClockIt, you will need to match the users with the correct enroll ID. Enroll ID's are obtained from the device as a part of the sync process. You will see all your users created with name as "NO NAME". Click on the edit button for each user and fill up the details as mentioned below.
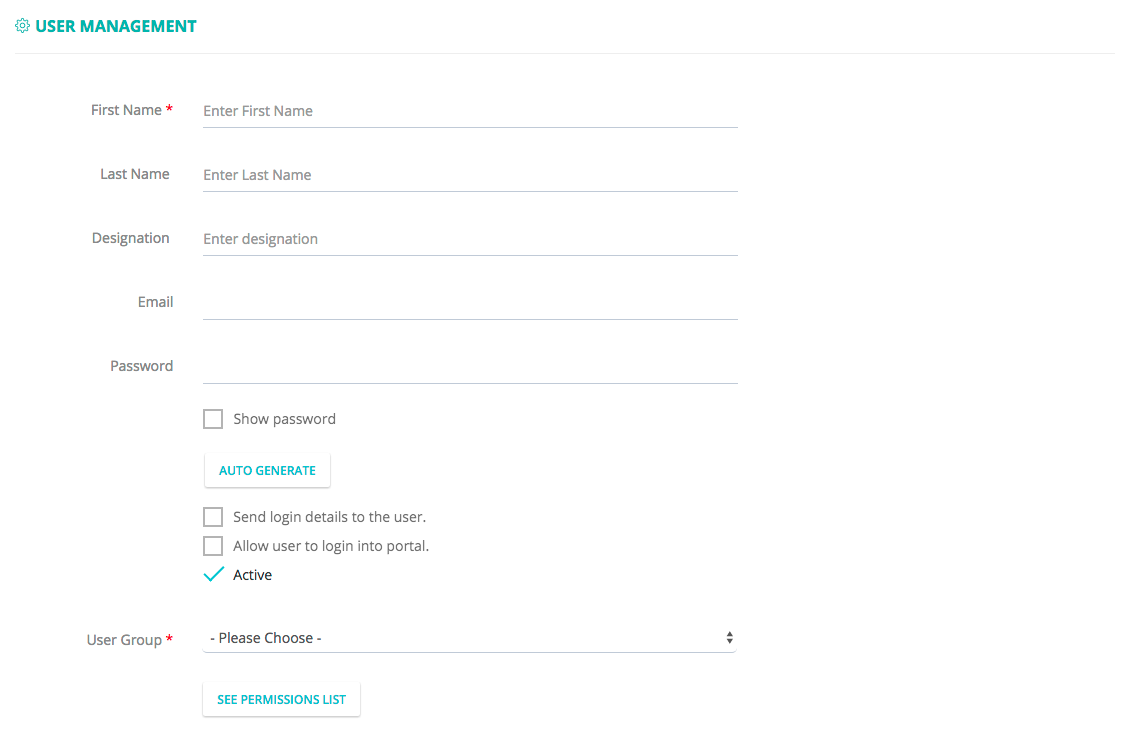
In the user management form there are a couple of details that needs to be entered.
First Name, Last Name and Designation. Designation is only used in the reports and the user profile.
If you want your employees to get the end of day attendance report. You can specify the email address. If not this field can be left blank.
If you want to give employee access to ClockIt to this employee you can create a password for this user. You may also auto generate a password for this user.
You can send the credentials automatically to the user by ticking the "Send login details to the user."
You can also restrict the user from logging into ClockIt by using the "Allow user to login into portal." option.
Active employees are those that are being tracked by ClockIt. By making a user Inactive, they will not be able to login into ClockIt and neither will ClockIt compute the time and attendance for an inactive user. ClockIt only counts the active employees for the purpose of billing.
Depending on the kind of access you would want to give your employees, select the user group from the dropdown. You can add as many groups as you wish from Company > Manage Groups. Each group has its own set of permissions. By default ClockIt will create two groups, the Admin and Employee Groups. You can modify this at any point of time. Please read our detailed article within this wiki by clicking here.
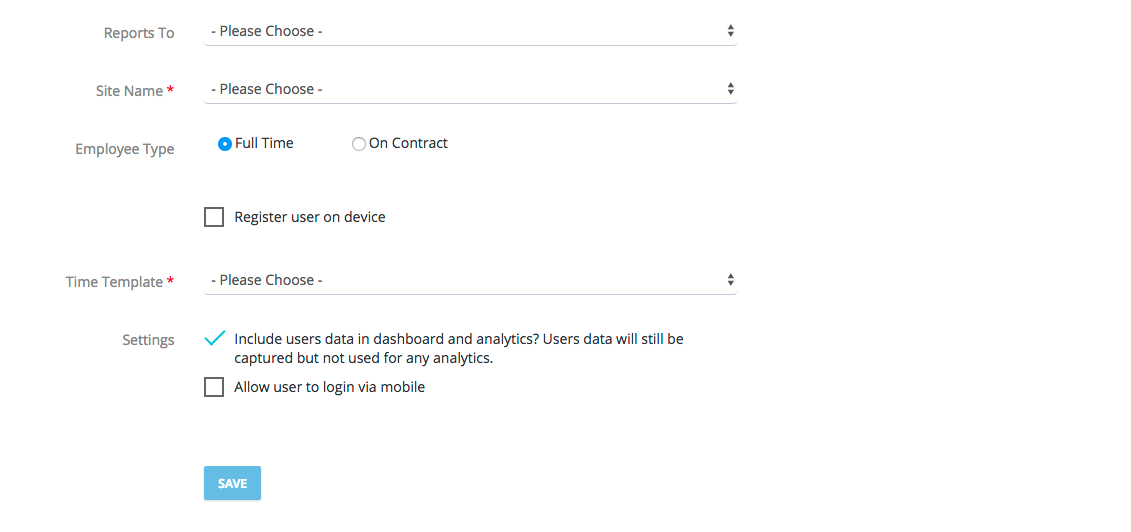
Next you will need to specify the reporting person for the employee from the dropdown. Reporting managers must be users of ClockIt. All leave requests, business travel requests, attendance data can be viewed by the reporting manager under the manager dashboard. To know more about the Manager Dashboard click here.
Next you will need to specify the site that this user belongs to. Site are predefined and can be managed under Company > Manage Sites.
Select the type of employee either Full Time or on Contract. You will need to create your contractors list from Company > Manage Contractors if the employee belongs to a contractor.
If you are not using a biometric device to track employees you can jump directly to step 20.
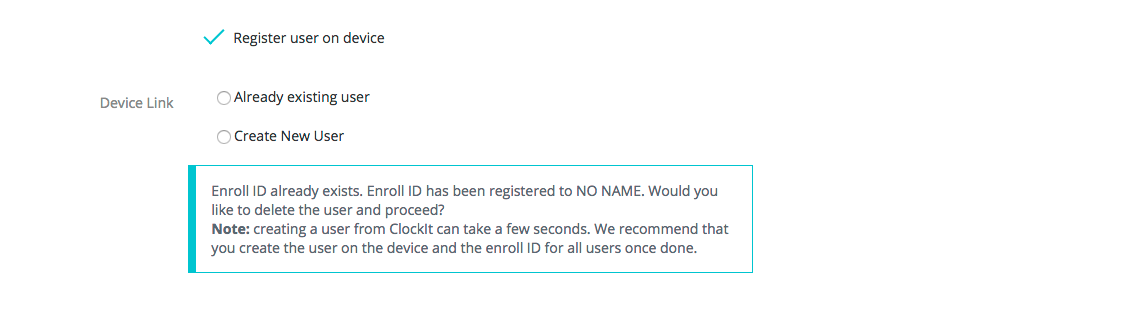
There are two ways to link a ClockIt user to the biometric device. You can create the user from ClockIt and assign the ID to an already existing user on the device or create a user on the device from ClockIt.
If your device is already synced with ClockIt, you would only need to click edit user from the users table corresponding to the user ID on the device and update the details for this employee. In this case after device sync you will have a list of users with name as NO NAME. In case of editing the user details, ClockIt will preselect the user from users that are identified after the device sync.
If you wish to create a user in the device from ClockIt, select create new user by selecting a device from the dropdown and specifying the Enroll ID. The Enroll ID need to be less than or equal to 9 characters. Note that all punches are recorded under this Enroll ID in the device. You will also need to register the users fingerprint on the biometric device under this enroll ID.
Clockit will automatically sync the name of the employee into the device. Employees can verify their name on screen every time they punch.
Select time template the this user needs to follow from the drop down. You can manage your time templates from Company > Time Templates.
The next option is to tell ClockIt if an active user needs to be monitored. For example a company owner will need to have access to the ClockIt portal and may punch or not. The owner may not want to be tracked on the ClockIt analytics and reports and will not want the attendance performance emails.
If you want the user to login using the mobile for tracking attendance, you can enable the next field. If enabled you can also also select the tracking accuracy. The higher the tracking accuracy the more the battery drain.